Visit the website: https://trk.elementor.com/25576
What is Elementor?
At its core, Elementor is a WordPress page builder.
If you’re unfamiliar with that terminology, it just means that Elementor helps you build your content and website using simple drag and drop controls with a live visual preview, rather than requiring you to mess around with the underlying code. Basically, you:
- Build your page rather like Lego® by simply dragging and dropping different “elements” together to create a design.
- Don’t need any knowledge of coding whatsoever, so if HTML, CSS, and stuff like that freaks you out, read on.
- See exactly what your visitors will see, making it easy to know exactly how your finished design looks.
Most non-developers love page builder plugins because they let you create more styled content without learning HTML/CSS. You can even import pre-built templates where much of the hard work has already been done for you.
Key Features of Elementor
What’s Included in the Core Version?
The core Elementor page builder is 100% free. Using that alone will let you make some pretty stellar pages. It includes goodies like:
- Drag and drop live editor – Build your pages using pre-made elements.
- More than thirty widgets – Add things like buttons, videos, social icons, galleries and images, Google Maps, headings, etc., to your pages.
- Library of over thirty pre-built templates – For super quick page creation.
- Five website kits – These readymade websites are ideal if you have no clue where to begin or suffer from a chronic lack of creativity.
What’s Included in the Pro Add-on?
Things get even more interesting if you purchase the Pro add-on. This gives you access to some handy additional features:
- More advanced drag and drop editor – This offers much more flexibility and control over how your page looks.
- Theme Builder – This allows you to deeply customize your site’s headers, footers, posts and pages, archives, WooCommerce products, etc., using the same drag and drop interface.
- Dynamic content – You can insert dynamic content from custom fields in your designs.
- Popup Builder – You can design flexible popups and display them on your site.
- Form Builder – Add eye-catching custom forms to your site, with all collected data stored in Elementor.
- WooCommerce Builder – Design your store’s shop and archive pages.
- Global fonts and colors – This makes it easy to ensure a cohesive site design and quickly make changes across your entire site.
- More elements – You get tons more fancier elements to build your website.
- Pro templates – While the free version includes a bunch of basic templates, the Pro add-on includes over 300 additional professionally designed ones.
- Pro website kits – In addition to the five basic website kits included with the free versions, Elementor Pro adds over sixty premium ones.
- Global widgets – These let you reuse the same widget on multiple pages and then edit that widget from one location.
- Live custom CSS – Elementor Pro allows you to easily add custom CSS right from the Elementor interface.
- Premium Support – This is available 24/7 through the account dashboard
300+ Ready-Made Templates
As a professional designer, I approve of Elementor’s templates! Even if you have no eye for design, they make it easy for you to create beautiful, professional-looking websites. There are two template types: full-length page templates (called Pages) and smaller, individual elements (called Blocks).
Pros and Cons of Elementor
As with everything in life, Elementor has both good and bad points:
Pros:
Elementor has tons of great plus points, and choosing which to include in this list was a challenge. However, these are the ones which I feel are most noteworthy:
- Ease of use –You don’t need any coding knowledge, and the drag-and-drop interface makes building pages and posts a breeze.
- Pre-built templates and websites to get you started – If you are like me, you probably find a blank screen or sheets of paper freakily daunting. Having readymade templates can help overcome any creative blocks you may have, and can form the basis of an awesome website without needing to engage a graphic designer or web developer.
- Customization possibilities – The sky virtually is the limit when it comes to tailoring everything to your precise needs, particularly if you have Elements Pro.
- Value for money – I have still to discuss the pricing of Elementor, but here’s a spoiler alert: it’s excellent value for the extensive features you get.
- Integrations – Elementor is well supported and works seamlessly with most themes and plugins. Moreover, there are tons of aftermarket addons to enhance its functionality even further. That said, Elementor has so much functionality that it negates the need for some plugins, The benefits of that are cost savings and a reduced number of speed-sapping plugins. A win-win in my opinion!
- Customer support – Elementor took a real battering following the release of 3.0 which saw their customer support overwhelmed. As a result of that, they have completely updated their customer support procedures and have taken solid steps to ensuring customers are always kept happy.
- Easy to optimize for all device types – Noawadays, most people use mobile devices to view content. That said, desktops and laptops are not dead yet. Therefore, it is essential that your content looks and works great regardless of the devices your visitors happen use. In this respect, Elementor allows you to view everything as if it were on a desktop, tablet, or mobile phone, so you can nip any problems in the bud before the site goes live.
Cons:
In all honesty, I struggled to find any real issues with Elementor that could be construed as definite ‘cons.’ The following are the best I could muster. They are all pretty subjective and relatively trivial, but I want you to be aware of them:
- Learning curve – This not so much of a con, but it is an important point. Despite all the promises of drag and drop being easy, it all really depends on what you are used to. So if you have never used Elementor before, be prepared to spend a little time learning it. It’s rather like going from a Windows computer to a MacBook – things may not be where you expect to find them, but they are there! Mercifully, there are plenty of tutorials available in blogs and on YouTube to help you.
- Speed – This is a bit of a hot potato which I have covered later in this review. You will read lots about Elementor slowing sites down. Personally, I have not found this to be the case, and the developer is making every effort to ensure it performs as fast as possible. The brutal reality is that all page editors have an impact on site speed compared to ones coded from scratch.
- Issues following rollout of updates – As already mentioned when Elementor 3.0 was rolled out, it had bugs. Lots of them. As a result, their customer support became swamped with queries and complaints. Fortuately, those bugs have since been ironed out, and the developer has learned a valuable lesson on releasing updates without thoroughly testing them first. So, hopefully the same scenario will not reoccur in the future. Either way, it is good practice to back up your site before installing any updates, and you can always clone your site to a staging site to test out the update first.
How the Main Interface Works
There are a lot of nitty-gritty details to cover, but let’s start with an introductory look at how you can build a page with the free Elementor page builder.
When you first launch Elementor, you’ll see a live visual preview of your website, with some added elements (these are what let you create your designs.)

There are three core areas you’ll work in (identified in red boxes in the image above):
- This is where you see a live preview of your design. You see exactly what your visitors will see when they come to your site, which makes it very easy to design. This is also where you can create “sections” which help you organize your “widgets”
- These are the widgets you can use to build your designs. You just drag them over to the live preview. Then, you’ll be able to customize each widget using the same sidebar.
- These are helpful controls that let you see how your design will look on different devices, undo/redo changes, and some other useful functions.
Building Your Page With Widgets/Elements
If you’re already familiar with page builders, this might not blow your mind. But if you’re not, this is pretty cool and is why people love page builders:
Let’s say you want to add a button to your page. Rather than messing around with HTML/CSS like you usually would, all you need to do is drag over the button element from the left-hand side:

To add more design elements, you just keep dragging over widgets. Once you get the hang of things, you’ll be able to create something like this without writing a single line of code:
Six specific Elementor features that help make it great
Now that you have an understanding of the basic interface, let’s take this Elementor review a bit more hands-on and dig into some of the specific features that have helped make Elementor so successful.
1. The Elementor template library
While Elementor does give you the power to create complete designs from scratch…you don’t always need to do everything yourself thanks to the Elementor template library.
This library includes a bunch of templates that you can insert with just a click:
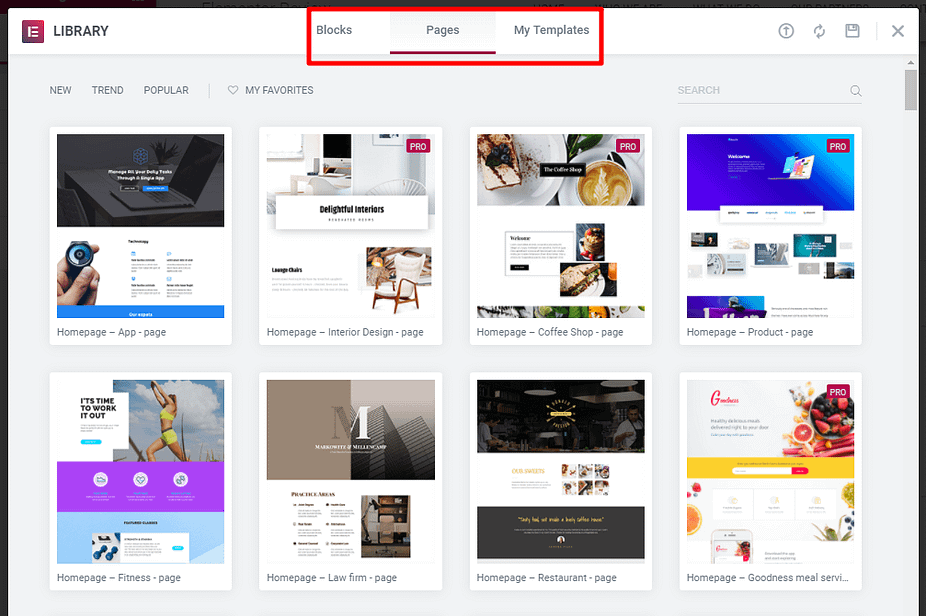
As of Elementor 2.0, these templates now come in two formats:
- Pages – these are full-page designs that you can import and then tweak as needed.
- Blocks – these are designs for specific “sections”, rather than entire pages. For example, if you just want to drop in a pre-built contact section to an existing layout, blocks can help you do that.
Once you have some of your own designs, you can also save them as templates or blocks to easily reuse them later on.
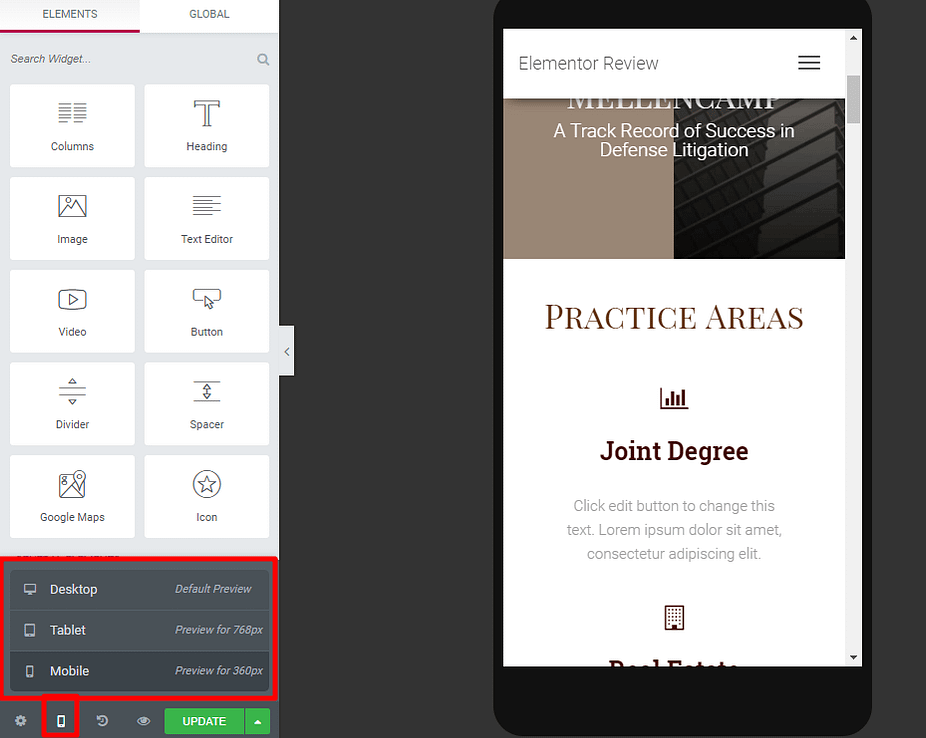
2. Mobile previews and responsive design controls
With a massive portion of the web’s traffic happening on mobile devices nowadays, you need the mobile version of your site to look great.
First, some good news:
All of the designs that you create with Elementor are automatically responsive (that is, they look good on mobile).
If you ever want to see how your design looks on a different device, Elementor lets you quickly launch a preview without leaving the interface:
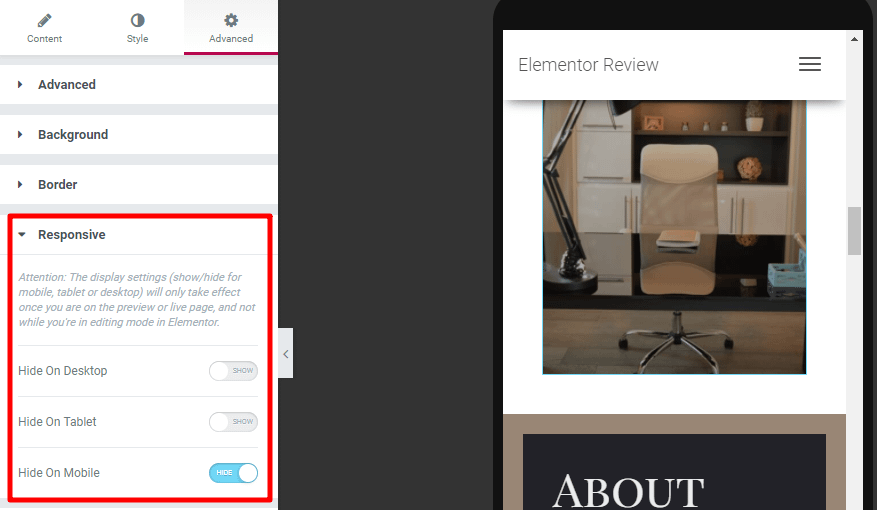
Elementor also takes things further by letting you show/hide individual widgets on certain devices.
For example, if you have a huge hero image, you might not want to display that image on the mobile version of your site. Elementor’s responsive design controls let you hide it on mobile devices with the click of a toggle:
3. Detailed layout controls
Because page builders eliminate the need for custom code, sometimes you have to sacrifice a little flexibility over where you position elements in order to achieve that simplicity.
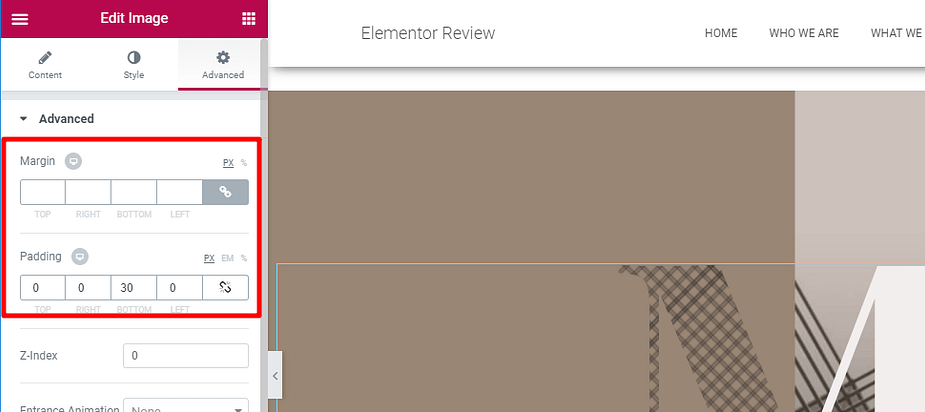
What’s great about Elementor, though, is that it gives you tons of intuitive controls to make sure that you can place every widget, section, and column exactly where you want it. You can:
- Manually set padding and margin for sections, columns, and widgets
- Adjust column widths by just dragging the divider between columns
- Position widgets vertically within a column (or columns within a section)
- Create a blank space between columns with adjustable column gap
4. Inline text editing
Inline text editing is a convenient method for editing text on your page. Rather than needing to use a popup like some other page builders, Elementor lets you just click on the page and start typing:
5. Easy undo/redo and full revision history
Anyone who has never made a mistake has never tried anything newAlbert Einstein
As Albert so kindly tells us, you’re probably going to make a mistake (ok, mistakes) when you try out new design approaches.
If you do mess something up, Elementor makes it easy to undo your mistakes in two different ways.
First, every single action that you take* is logged and can be reverted as needed:
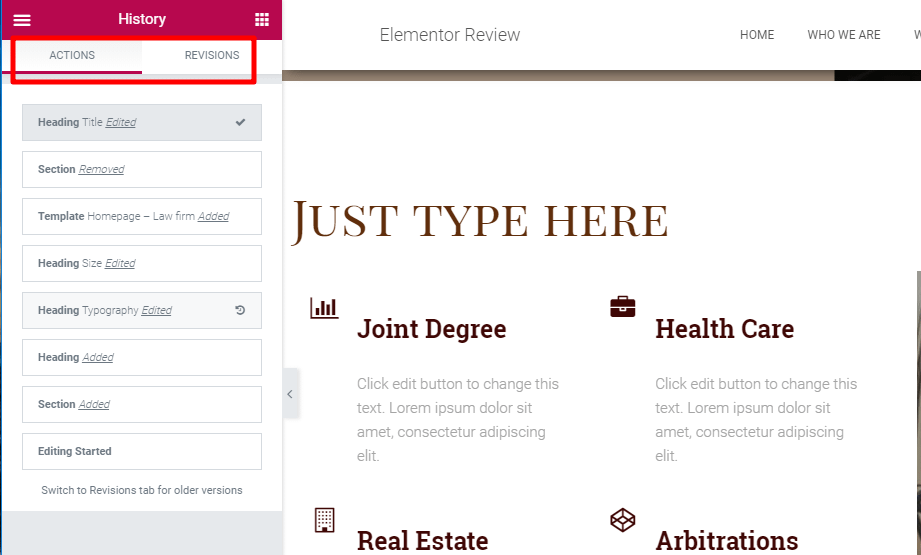
Second, every time you save your design, you’ll also get a completely new revision that you can revert to if needed.
*These individual actions are cleared when you exit the interface. So it’s every single action that you take during a specific design session. Saved revisions are always accessible, though.
6. Clean code if you ever deactivate Elementor
If you ever need to deactivate Elementor at some point in the future, you can rest easy knowing that it’s not going to leave behind a mess of shortcodes like WPBakery Page Builder or the Divi Builder.
Using the Theme Builder
It only takes three easy steps to create a new theme in Elementor using the Theme Builder:
Step 1: Create a New Template
The Theme Builder works via “templates.” When you create a template, you can choose what type of template it is from the drop-down:

For example, to design your header, you’d choose Header. Similarly, to create single post templates, you’d select Single.
I’m going to design a Header post template, but the same general principles apply no matter what part of your theme you’re working on.
Step 2: Choose a Building Block or Build From Scratch
Once you choose what type of template to create, Elementor will display a list of Blocks that fit that type of content.

While you can always build everything from scratch, these building blocks can save you considerable time and effort.
Once you launch the interface, you can edit or build your theme part using the exact same Elementor interface from above.
You’ll also get a new set of Theme Elements to use. For example, while “Your New Blog” in my demo doesn’t look very impressive, that’s actually using the Site Title widget (which pulls automatically from your WordPress settings):

All of these Theme Elements pull in information dynamically. For example, if you use the Post Title element, it will dynamically show the actual title of each post.
You’ll also get new styling options that apply to that specific theme part. So, if you style the section that contains your header elements, you’ll get a Scrolling Effect option that lets you create a sticky header on specific devices:

Step 3: Publish Your Theme Part
Once you go to publish your theme part, Elementor will let you use Conditions to control precisely where your theme part displays.
For a header, you might want to choose the Entire Site option to display it everywhere.
But these controls are actually pretty detailed, which can come in handy if, say, you just want to apply a specific post template to a particular category of blog posts:

Once published, your theme part will start working immediately. In the example I created, you can see that, while I didn’t design a particularly attractive header, it is indeed live on my site:

Pricing: How Much Does Elementor Cost?
I’ve already mentioned that the core Elementor page builder plugin is 100% free and available at WordPress.org. Even by itself, the free version is already powerful and will allow you to create great websites and pages.
However, if you want access to the full theme builder and all the other cool features in Elementor Pro, you have four different plans from which to choose: Essential, Expert, Studio, and Agency. Annual pricing starts at just $49:

The Essential plan would be perfect for most users, but if you have more than one site to cover, then Expert would be the one to go for. Studio and Agency are geared more towards developers and agencies creating sites for other people.
I’m not going to directly compare Elementor to the competition as that would take a month of Sundays. However, looking at the pricing of other popular page builders, I think it is very competitive and offers excellent value for money.
Incidentally, you can also purchase a hosted Elementor website package. That costs $89 per year and includes everything you need to get a website up and running in no time, including hosting, SSL certificate, 20GB of storage, a custom domain, automatic backups, and more. The great thing about that package is everything is kept under one roof, a real advantage when you need technical support.
Annoyingly, no lifetime plans are offered, which is a shame as I tend to stick with things I like and am happy to pay a little more upfront to get continuous coverage.
Is it worth paying for Elementor Pro? In my opinion, yes, it is because $49 per year is a small price to pay for the masses of additional functionality you get with the upgrade.
The Verdict
I only started using Elementor on my websites over the last year or so. But, in all honesty, I should have used it long before that. I admit that the rumors relating to its performance put me off, but speed has never been an issue since switching to it. What’s more, the functionality it includes – even in the free version – is second to none.
But there’s also another valuable thing that you get when you choose to build your site with Elementor: the Elementor team doesn’t rest on its laurels. Despite their incredible success to date, the developer continues to roll out enhancements and improvements. They clearly strive for perfection and aren’t going to stop until they get it.
That is an important factor when choosing a WordPress page builder. Being a long-term decision, you want to go with a team that’s in it for the long haul – one that will not just be maintaining the plugin but improving it also.
Elementor certainly isn’t the only team that checks the right boxes. For example, Divi Builder and Beaver Builder are also great page builder plugins, but the Elementor team has the most impressive resume over the past few years in terms of rolling out helpful new features. It is no wonder that they have gone from zero to ten million sites in five years!
For those reasons, I think Elementor is the best page builder for both now and the foreseeable future.